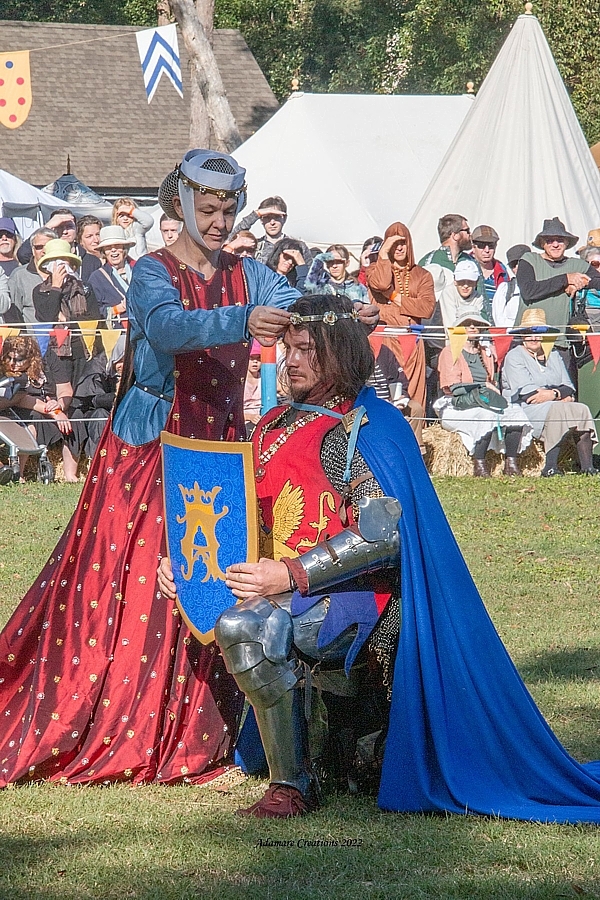
Ceremony of Chivalry, 2022
15 July 2022 10:57 pm
Here we see the culmination of three of the projects I have been working on for the Opening Ceremony of the Abbey Medieval Festival 2022: The Shield of Valour, the Mantle or Temperance and the Crown of Chivalry.
All in all, I'm really pleased with how it looks on him, and I'm super pleased with this photo by Adamare Creations who captured me bestowing the crown on our lovely Sir Richard Sheffield.
The entire Opening Ceremony went really well, with laughter where it should have been, seriousness where it should have been, lots of colour and a great Lord Herald narrating. It was a huge amount of work to organise, but on reasonably short notice, I'm pleased at the feedback. The CEO and Director of the Museum were both delighted, so that's what matters.
Further posts and photos of the event to follow... lots happened and much was extremely successful.
Circlet for Lady Valour
26 June 2022 07:08 pm
Having discovered that the proposed circlet for the Lady Valour for the Festival Opening Ceremony didn't really match her new surcote (see previous posts), I've needed to make another little one using the exact materials I used for the trim.
Luckily, I had some cotton tape in cream which more or less matched the fabric, and was able to stitch the gold braid to it and sew the "red coral" and "pearl" beads on in alternating colours.
Again, this isn't a re-enactment piece, so correct materials aren't necessary.
Another job ticked off the list!
The Crown of Chivalry
21 June 2022 11:30 pm
I give you another one of the props for the Medieval Festival Opening Ceremony- a medieval flower crown, the Crown of Chivalry. This is to be presented to the Knight along with the Shield of Valour and the Mantle of Temperance.
It was made by me along the same lines as the last two- with the additions and decorative features added on pins with flat heads to secure them. here's a close up look at the tiny silver flowers and freshwater pearls in between the large silver roses.

I was particularly excited to source the flowers, and anyone who makes beaded jewellery may notice that they are, actually, bead caps. The brass pins and the pearls make the flower centres.
I was exceptionally lucky to get the silver flowers for a bargain price as the owner of the bead store could find them listed in the inventory and wasn't planning on getting more, so they just made me an offer which was so good that I bought every last one they had in the shop.
The roses themselves look a little large, but they need to be seen from further afield, quite literally, than others. I considered that in some medieval artworks, these might be quite large anyway, so I felt that after the ceremonies are over, I can wear the circlet for myself on other occasions.
Another job ticked off my list for the Abbey Medieval Festival.
Medieval Wedding Circlet
21 June 2022 10:25 pm
I love making things and I wanted to make a little something for a young friend who had recently married. I just couldn't decide what, exactly. Something she didn't already have. Clearly, more bling was the answer, but what kind of bling?
I pondered for exactly 5 seconds before I knew that a circlet was the answer! Something hand made and a little bit special. I had a few bits and pieces already, but could I make something nice? I was going to try!

First I gathered my tools and looked at the base items. I silver circlet, gold-plated roses and freshwater pearls. I already had a plan to attach the roses with pins through the pearls and roses and bend the backs over, which is a reasonably medieval technique. I felt that some colour was in need, and remembering that the young lady has a gorgeous orange silk kirtle, decided a deep orangy red carnelian would make a nice contrast to the silver and gold and match her dress also.

The pins have large, flat heads on them to secure the pearls and carnelians. Here's what the underneath of them look like when they're waiting to be added. I carefully punched evenly-spaced indentations with a hammer and nail then drilled the holes into the circlet itself. Nail-biting stuff as I was anxious about scratching the silver circlet.
Once the holes were drilled, I poked the pins through and bent the backs over which is harder than it sounds, believe me. They need to be really folded down or the roses and carnelians on the front sort of sag sadly.
Once that was achieved, I glued the band to the inside so the back of the pins don't snag on the veil and scratch the young lady's head. I'm really pleased with the results, and have another similar-but-different one in silver to make for myself

Was the young lady excited? As I write she's only seen pictures and won't receive it for another few weeks. I'm hoping she will love it!
